How to integrate a Drift camera into your APP
Drift has open APIs to allow users to utilize their product for various customized applications. This document explains how to get a real-time video stream from a Drift camera, and how to remotely control or configure Drift cameras.
An application can access the live video feed from Drift camera through RTSP protocol. The Drift camera acts as a video streaming server when configured, while the application, run on either a PC or mobile phone, can acquire real-time video stream through RTSP URLs.
Besides acting as an RTSP server, Drift cameras can also be configured or commanded to livestream to an RTMP server (either in the cloud or in a local network).
1. WIFI CONNECTION
Drift Cameras operate in “Station” mode - allowing applications to access the camera through a Wi-Fi router or mobile personal hotspot.
Drift provides two methods for configuring the Wi-Fi network, one is through a Script File specifying the Wi-Fi info and stream information, and the other is through QR code scanning to obtain the necessary details.
1.1 Script File
Create a text file named "fmcam.conf" and fill in the following details according to your network settings. Save the file to the root directory of the camera's memory card, ensuring it has a ".conf" suffix.
router_ssid=xxxxxx
router_password=12345678
stream_type=rtsp
stream_resolution=720P
stream_bitrate=2000000
stream_framerate=30
For example:

Note:
a) “router_ssid” and “router_password” should be replaced with your Wi-Fi router or mobile hotspot's SSID and password.
b) The stream resolution can be set to 480P, 720P or even 1080P. A bitrate of 2000000 corresponds to 2Mbps. Framerate options are 30 or 60. The recommended settings for each model are as follows
- Ghost X: 720P, 2000000, 30 (Do not set higher than this to avoid camera freezing)
- Ghost XL: 720P, 2000000,30 (Do not set higher than this to avoid camera freezing)
- Ghost 4K+, 1080P, 8000000, 60 (Can support up to 4K resolution and 30Mbps bitrate)
c) once the file “fmcam.conf” is on the memory card, each time you power the drift camera on it will automatically open the Wi-Fi network and act as a video streaming server. If you don’t want to use this feature anymore, simply delete the file and camera will resume to normal. You can also break the Wi-Fi connection by pressing the Wi-Fi button when the camera connect to the Wi-Fi network.
1.2 Scan QR-Code
Drift has designed an easy and intuitive solution to establish connection between camera and application when both are in the same network. The workflow is as follows: Application creates a QR code with router’s SSID/Password contained, Drift camera scans the QR code to get the info then it will automatically connect (to the router).
The format of the QR code is:
17|router_ssid|router_password|stream_type
Definition:
- 17: A fixed value indicating the QR code type.
- "router_ssid": The Wi-Fi name, which cannot be empty.
- "router_password": The Wi-Fi password, which can be left empty.
- "stream_type": The type of stream, only RTSP is supported.
For example:

Any official QR code tool (e.g. https://www.qr-code-generator.com/) can generate the required code with the text. To develop your own app, you can take the below open source as reference.
ZXing ("Zebra Crossing" barcode scanning library for Java, Android).
https://github.com/zxing/zxing
2.0 Get camera IP address
Once the Drift camera has connected the WiFi, it will broadcast a UDP package to present itself to devices (mobile or PC) in the same network. The package contains the necessary info for the device to establish the connection. Once connected, the device (mobile or PC) can issue HTTP commands to Drift camera for further actions, the following are the details of how the connection can be established.
The broadcast package format is as follows, with the UDP broadcast port being 5555.
5|cam_serial|cam_model|phone_uuid|rtmp_status
Definition:
- 5: A fixed value indicating the broadcast type.
- cam_serial: Camera Serial Number.
- cam_model: Camera Model.
- phone_uuid: Can be set in the Script File "fmcam.conf" with a line like "phone_uuid=******", limited to 64 characters. If not specified, this item will be empty.
- rtmp_status: Camera Status, default is "N" indicating normal status, not live streaming.
Note: The camera's IP address is embedded in the UDP message header and can be extracted. For example:
For example:
"5|86QHPFKVRIR0AB36|X5||N"
- "86QHPFKVRIR0AB36" is the camera's serial number.
- "X5" is the camera model name.
- The phone_uuid is not specified.
- "N" means the camera is in normal status.
3.0 Acquire real-time video feed from camera
Once the connection is established, an application can use a media player (such as VLC, ijk or vitamio player) to acquire real-time video feed from Camera. The RTSP URL address format: rtsp://Camera IP/live
1) Install VLC player on PC.
2) Get the camera’s IP address (For example: 192.168.4.148)
3) Open VLC on your PC, navigate to media / open network streaming, input below texts “rtsp://192.168.4.148/live” in the URL dialog ,
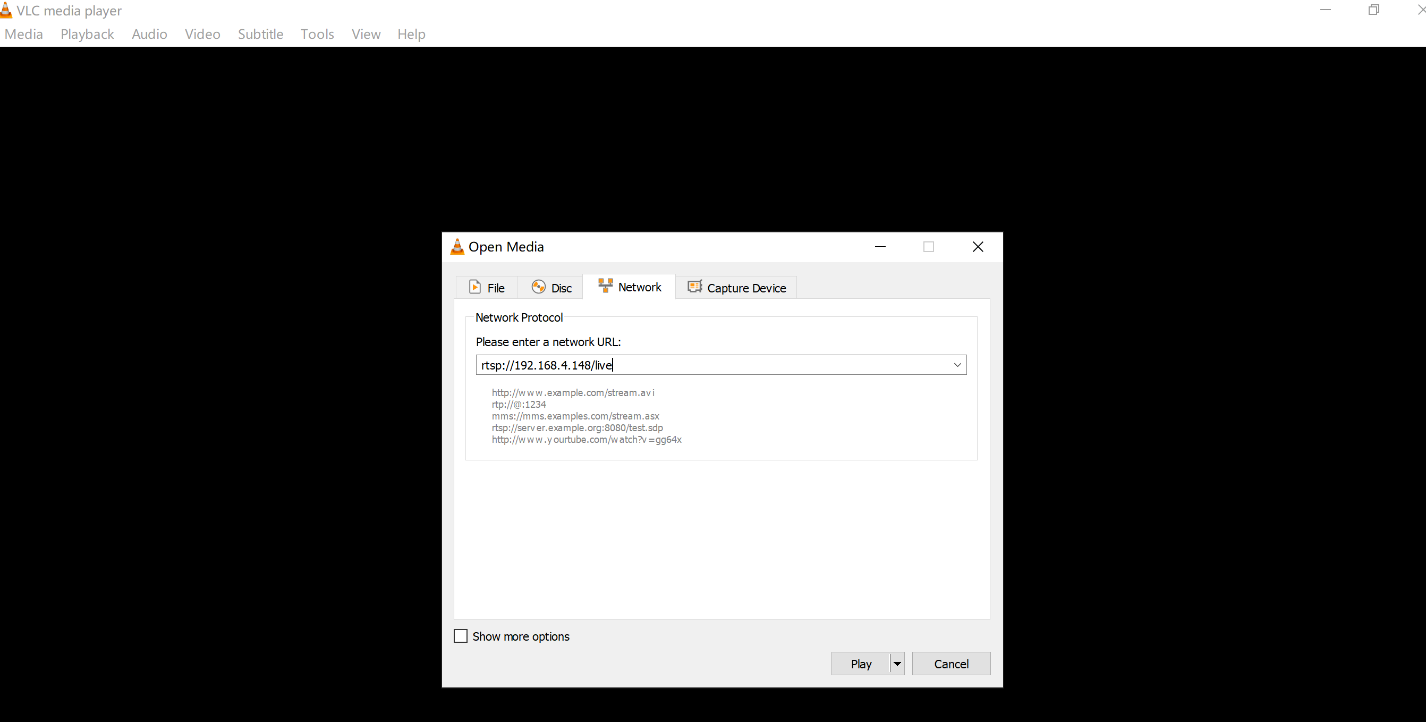
4) Click on “Play”, you should see the live video on your VLC player.
4.0 Live camera video stream to RTMP server.
Once the connection is established, an application can stream the real-time video feed from Camera to RTMP server through below HTTP APIs. Get the camera’s IP address (For example: 192.168.4.148), and issue the below commands start live streaming or stop live streaming.
4.1 Setup RTMP live streaming
Here, “192.168.4.133:1935/live/5” represents the URL of your RTMP server, with “rtmp://” omitted.
You can also setup the livestream resolution & bitrate with this command.
Note:in case the RTMP URL contains 【&】 character, please replace it with 【***】.
For example:
If the rtmp url is
"rtmp://wxalivepush.weixin.qq.com/live/wx3059da5fb34ccef3-4?txSecret=bc91766cea0589c907c764cdf41d0047&txTime=629f7600"
The URL should be replaced to
"rtmp://wxalivepush.weixin.qq.com/live/wx3059da5fb34ccef3-4?txSecret=bc91766cea0589c907c764cdf41d0047***txTime=629f7600"
4.2 Stop live stream
http://192.168.4.148/cgi-bin/foream_remote_control?stop_rtmp
5.0 Control the cam to pull audio stream from the RTSP server.
The Drift camera is able to offer an RTSP video for remote accessing, it can also play audio stream with format(AAC , dual channels, 16K sampling rate) from an Remote RTSP Server.
1) Configure the cam with the rtsp_url
http://192.168.5.181/cgi-bin/foream_remote_control?rtsp_url=rtsp://192.168.5.53/audio_test_file.aac
2) Configure the cam with the rtsp url and command it to play the audio stream
3) Configure the cam to stop playing the audio stream
http://192.168.5.181/cgi-bin/foream_remote_control?stop_rtsp
Note: in above examples, we assumed the cam IP is 192.168.5.181, you should write your own cam IP when using these commands.
6.0 Control the cam to play audio file from remote server or located in memory card
The Drift camera can also play audio file with format (AAC , dual channels, 16K sampling rate) from remote server or located in memory card.
1) Play Audio File in camera
http://192.168.5.181/cgi-bin/foream_remote_control?play_audio_file=/tmp/SD0/audio_test_file.aac
Put the audio file (e.g.: audio_test_file.aac) to the Micro SD card of your camera. Issue the command will activate the camera play the audio file.
The audio file "audio_test_file.aac" must comply with AAC codec,dual channel and 16KHz sample rate.
Here is one example. http://www.driftlife.co/download/audio_test_file.aac
2) Play Audio File from network
http://192.168.5.181/cgi-bin/foream_remote_control?play_audio_url=http://www.driftlife.co/download/audio_test_file.aac&file_size=23316
Here, two parameters , one is the download ULR of the audio file and the other is the audio file size.
7.0. Camera control
Once the connection is established, the application can manipulate camera with the commands through HTTP APIs.First, get the camera’s IP address (For example: 192.168.4.148), and issue the below commands control your Drift camera.
7.1 Operations API
1) Zoom in/out
http://192.168.4.148/cgi-bin/foream_remote_control?dzoom=1
where the value set to dzoom can be from 0 to 10, 0 means no dzoom.
2) Start Recording
http://192.168.4.148/cgi-bin/foream_remote_control?start_record
3) Stop Recording
http://192.168.4.148/cgi-bin/foream_remote_control?stop_record
4) switch to video mode
http://192.168.4.148/cgi-bin/foream_remote_control?switch_video_mode
5) switch to photo mode
http://192.168.4.148/cgi-bin/foream_remote_control?switch_photo_mode
6) take photo
Before take photo, you need to make sure cam is on photo mode, you can run switch_photo_mode cmd to switch mode.
http://192.168.4.148/cgi-bin/foream_remote_control?take_photo
7) Reset Setting
http://192.168.4.148/cgi-bin/foream_remote_control?reset_setting
8) Reboot your Camera
http://192.168.4.148/cgi-bin/foream_remote_control?reboot
9) Power off your camera
http://192.168.4.148/cgi-bin/foream_remote_control?power_off
11) Record with parameters
http://192.168.4.148/cgi-bin/foream_remote_control?record_with_param=PriName&sec_id=SecName
This API can be used to name the file name generated by video recording. The keywords are PriName and SecName. The keywords only support letters and numbers, so the generated file name is: "Priname_Secname". You can get the customized name from mediaInfo API.
For example:
issue the following commands to camera:
http://192.168.4.148/cgi-bin/foream_remote_control?record_with_param=T002&sec_id=L0000001
http://192.168.4.148/cgi-bin/foream_remote_control?stop_record
http://192.168.5.62/cgi-bin/foream_remote_control?mediaInfo
the camera will return the file info like:
{
"path": "100MEDIA\\VID00024.MP4",
"name": "T002_L0000001",
"time": "2024-01-01 00:38:55",
"size": "69512330"
}
7.2 Camera Settings
1) Setup Camera LED Indicator
http://192.168.4.148/cgi-bin/foream_remote_control?led=1
where the value: 1 stands for On, 0 stands for Off
2) Setup Camera Exposure Value
http://192.168.4.148/cgi-bin/foream_remote_control?exposure=1
where the value: 0 stands for 0, 1 stands for 1, 2 stands for 2, 3 stands for -1, 4 stands for -2.
3) Set Camera Filter
http://192.168.4.148/cgi-bin/foream_remote_control?filter=1
where the value: 0 stands for Normal, 1 stands for Vivid and 2 stands for Low Light and 3 for Water.
4) Setup Camera Mic Sensitivity
http://192.168.4.148/cgi-bin/foream_remote_control?mic_sensitivity=1
where the value should be 0 – 4, stands for each Mic level.
5) Setup camera datetime stamp
http://192.168.4.148/cgi-bin/foream_remote_control?stamp=1
where the value: 0 stands for the closing datetime stamp (watermark), 1 stands for the opening datetime stamp (watermark).
6) Setup Camera fov
http://192.168.4.148/cgi-bin/foream_remote_control?fov=140
where the value should be 140,115,90.
7) Setup Camera thumbnail file
http://192.168.4.148/cgi-bin/foream_remote_control?thm=1
where the value should be 0 or 1.
8) Setup Camera language
http://192.168.4.148/cgi-bin/foream_remote_control?language=1
where the value: 0 stands for English, 1 stands for Chinese.
9) setup camera time
http://192.168.4.148/cgi-bin/foream_remote_control?set_time=2021-03-01_09:35:00
setup the camera time to : 2021/3/1 9:35.
7.3 LiveStream Settings
1) Setup Livestream Resolution
http://192.168.4.148/cgi-bin/foream_remote_control?stream_res=0
where the value of stream_res can be:
Ghost X,Ghost XL,X3: 0 (1080P), 2(720P), 3(WVGA)
Ghost 4K+, 0(4K), 1(4KUHD), 2(27K), 3(1080P), 4(720P),5(WVGA).
Note:camera of Ghost X, X3 and Ghost XL only support to 1080P, while Ghost 4K+ supports 4K.
2) Setup Livestream Bitrate
http://192.168.4.148/cgi-bin/foream_remote_control?stream_bitrate=1000000
where stream bitrate value is in Byte, 1000000 means 1Mbyte, 8Mbps.
Note: recommended to use 2.0Mbps for 720P, and 4Mbps for 1080P
3) Setup Livestream Framerate
http://192.168.4.148/cgi-bin/foream_remote_control?stream_framerate=30
where stream_framerate can be 30 for Ghost X, Ghost XL, X3, and up to 240 for GHOST 4K+.
GHOST 4K+ / N1 / N2:
4K(4096 * 2160 17:9): 24 / 25FPS
4KUHD(3840 * 2160,16:9): 24 / 25 / 30FPS
2.7K(2704 * 1520,16:9): 24 / 25 / 30 /50 FPS
1080P(1920 * 1080,16:9): 24 / 25 / 30 / 50 / 60 / 100 / 120FPS
720P(1280 * 720,16:9): 25 / 30 / 50 / 60FPS
WVGA(854 * 480,16:9) 25 / 30FPS
4) Setup RTMP live streaming
where 192.168.3.133:1935/live/5 stands for the URL of your RTMP server, here rtmp:// is omitted.
You can also setup the livestream resolution & bitrate with this command.
Note:in case the RTMP URL contains 【&】 character, please replace it with 【***】.
For example:
If the rtmp url is "rtmp://wxalivepush.weixin.qq.com/live/wx3059da5fb34ccef3-4?txSecret=bc91766cea0589c907c764cdf41d0047&txTime=629f7600"
The URL should be replaced to "rtmp://wxalivepush.weixin.qq.com/live/wx3059da5fb34ccef3-4?txSecret=bc91766cea0589c907c764cdf41d0047***txTime=629f7600"
5) Stop live stream
http://192.168.4.148/cgi-bin/foream_remote_control?stop_rtmp
7.4 Video Settings
1) Setup Video Resolution
http://192.168.4.148/cgi-bin/foream_remote_control?video_res=0
where the value of video_res can be:
Ghost X,Ghost XL,X3: 0 (1080P), 2(720P), 3(WVGA)
Ghost 4K+, 0(4K), 1(4KUHD), 2(27K), 3(1080P), 4(720P),5(WVGA).
2) Setup Video Bitrate
http://192.168.4.148/cgi-bin/foream_remote_control?video_bitrate=1000000
where video bitrate value is in Byte, 1000000 means 1Mbyte, 8Mbps.
3) Setup Video Framerate
http://192.168.4.148/cgi-bin/foream_remote_control?video_framerate=30
where video_framerate can be 30 for Ghost X, Ghost XL, X3, and up to 240 for GHOST 4K+.
GHOST 4K+ / N1 / N2:
4K(4096 * 2160 17:9): 24 / 25FPS
4KUHD(3840 * 2160,16:9): 24 / 25 / 30FPS
2.7K(2704 * 1520,16:9): 24 / 25 / 30 /50 FPS
1080P(1920 * 1080,16:9): 24 / 25 / 30 / 50 / 60 / 100 / 120FPS
720P(1280 * 720,16:9): 25 / 30 / 50 / 60FPS
WVGA(854 * 480,16:9) 25 / 30FPS
7.5 Camera Status
1) get camera current status (only support X3, GHOST 4K+, GHOST XL Pro, N1 and N2)
http://192.168.4.148/cgi-bin/foream_remote_control?get_camera_status
return camera status in XML, for example:
<?xml version="1.0" encoding="utf-8"?>
<response>
<status>1</status>
<cam_status>
<camera_status>
<capture_mode>0</capture_mode>
<battery>100</battery>
<sd_free>15804576</sd_free>
<sd_total>31166464</sd_total>
<rec_time>0</rec_time>
<fw_ver>1127</fw_ver>
<model_name>X5_Mini</model_name>
<time>2024-05-10 12:12:54</time>
</camera_status>
<video_setting>
<res>2</res>
<framerate>30</framerate>
<bitrate>2000000</bitrate>
<quality>0</quality>
</video_setting>
<stream_setting>
<stream_res>0</stream_res>
<stream_framerate>24</stream_framerate>
<stream_bitrate>2000000</stream_bitrate>
</stream_setting>
<camera_setting>
<dzoom>0</dzoom>
<filter>0</filter>
<exposure>0</exposure>
<mic>5</mic>
<led>1</led>
<fov>140</fov>
<thm>0</thm>
<stamp>0</stamp>
<eis>0</eis>
<speaker_volume>6</speaker_volume>
<iso>0</iso>
<voice>2</voice>
<language>1</language>
<cardv>0</cardv>
<cardv_interval>60</cardv_interval>
<video_timelapse>0</video_timelapse>
<video_timelapse_interval>10</video_timelapse_interval>
<wifi_frequency>0</wifi_frequency>
</camera_setting>
</cam_status>
<websocket>0</websocket>
<deviceid></deviceid>
</response>
Where the item :
<capture_mode>: 0 stands for video mode , 1 stands for photo mode, 2 stands for timelapse mode, 3 stands for burst mode; X5 Mini only support video and photo mode.
<battery> means the remaining battery in percentage
<sd_free> means the free size of TF card capacity in KB, if the free size is less than 400Mbps, it will prompt card full and the recording is not allowed.
<sd_total> means the total size of TF card capacity in KB.
<rec_time>: 0 means camera is in idle mode, otherwise it stands for current recording time.
<fw_ver> the FW verson.
<model_name> the model name of camera
<time>: camera time.
7.6 File operations
1) list SD media folders
http://192.168.4.148/cgi-bin/foream_remote_control?list_folders=/tmp/SD0/DCIM
list all the media folders (DCIM) in the camera SD card
<?xml version="1.0" encoding="utf-8"?>
<response>
<folders>{"Path":"100MEDIA"},</folders>
<amount>1</amount>
</response>
2) list SD media files
http://192.168.4.148/cgi-bin/foream_remote_control?list_files=/tmp/SD0/DCIM
list all the media files on SD card.
<?xml version="1.0" encoding="utf-8"?>
<response>
<files>
{"Path":"PH000011.JPG","CreateTime":"Apr 26 19:12:50 2024","Size":2034256,"Thumb":1},
{"Path":"PH000012.JPG","CreateTime":"Apr 26 19:12:54 2024","Size":1632571,"Thumb":1},
{"Path":"VID00013.MP4","CreateTime":"Jan 01 00:38:54 2024","Size":69512330,"Thumb":1},
</files>
<amount>3</amount>
</response>
Note:
If you want to preview or download the media file, please use the following URL:
http://192.168.4.148/DCIM/100MEDIA/VID00001.MP4
http://192.168.4.148/DCIM/100MEDIA/VID00002.MP4
3) list customized name video files
http://192.168.4.148/cgi-bin/foream_remote_control?mediaInfo
list all the video files witch was customized file name on SD card.
<?xml version="1.0" encoding="utf-8"?><Response><Status>1</Status><Files>
{
"files": [{
"path": "DCIM\\100MEDIA\\VID00001.MP4",
"name": "priname_name123",
"time": "2022-09-12 14:22:40",
"size": "86620487"
},
{
"path": "DCIM\\100MEDIA\\VID00002.MP4",
"name": "priname_name456",
"time": "2022-09-12 15:22:40",
"size": "85420487"
}]
}</Files></Response>
4) delete SD media files
http://192.168.5.56/cgi-bin/foream_remote_control?delete_media_file=100MEDIA/VID00003.MP4
Note: can't call this API if the camera is recording....
5) delete multiple SD media files
The separator character "|" is used between files. The first item must specify the number of files. The number of files must not be greater than 40, can't call this API if the camera is recording....
Note:For iOS app, need to replace the 【|】 character with 【*%7C*】, for example:
http://192.168.5.56/cgi-bin/foream_remote_control?delete_media_multfiles=3*%7C*100MEDIA/VID00003.MP4*%7C*100MEDIA/VID00004.MP4*%7C*100MEDIA/VID00005.MP4
8. get photo captured info
1) get information on photo captured recently. (only support GHOST XL Pro)
http://192.168.4.148/cgi-bin/foream_remote_control?get_single_cap_status
return camera status in XML, for example:
<?xml version="1.0" encoding="utf-8"?><Response><Status>1</Status><cap_info><path>100MEDIA/PH000008.JPG</path><time>2021-04-01 00:20:54</time></cap_info></Response>
Now, you can download the photo file by using the URL "http://192.168.4.148/DCIM/100MEDIA/PH000008.JPG"