GHOST N2 QUICK GUIDE
Thank you for purchasing the Drift GHOST N2
CUSTOMER SUPPORT
Download the full manual and check our official website for firmware updates, customer support, and info on all of our products.
https://driftinnovation.com/
If you have any suggestions, comments or concerns; please contact our customer support team at:
sales@driftinnovation.com
WARRANTY
Warranty does not apply if the product is damaged due to physical abuse, mishandling, accident, fire, frostbite, water damage, negligence or failure to follow the supplied operating instructions. For more information on warranty, see:
https://driftinnovation.com/warranty
CONTENTS
1. Product Specification
2. Package Contents
3. Installing the Module
4. About your Camera
5. Features Overview
6. Drift Link App
7. How to Access Real-Time Video (for developer)
8. Remote Control & Setup (for developer)
9. Auto Detection in a Network (for developer)
1. Product Specification:
Recording Resolution
4K(4096*2160 17:9) : 24/25FPS
4KUHD(3840*2160, 16:9): 24/25/30FPS
2.7K(2704*1520, 16:9): 25/30/50FPS
1080P(1920*1080,16:9): 24/25/30/50/60/100/120FPS
720P(1280*720, 16:9): 25/30/50/60/200/240FPS
WVGA(854*480, 16:9) 25/30FPS
Livestream Resolution
1080P(1920*1080,16:9): 30/60FPS
720P(1280*720, 16:9): 30/60FPS
WVGA(854*480, 16:9): 30FPS
Livestream bitrate:adjustable,8Mbps maximum
Livestream protocol: RTSP, RTMP, H.264
Mic: Internal and External
USB : Mini USB
Size: 43(W)* 82.2(L)* 31.4(H)mm
Weight:140g
2. Package Contents
Ghost 4K+ Camera
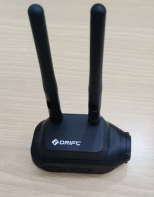
Image Transmission Module
Accessories bag
Antenna
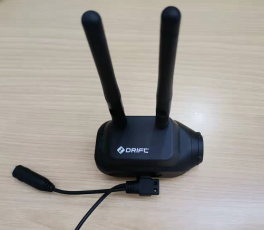
Power/Audio 2-in-1 Cable
Mini USB Cable
3. Installing the Image Transmission Module
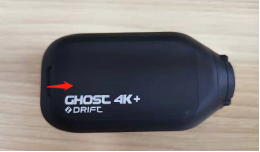
1. Remove the original battery module from your Ghost 4K+ camera.
2. Place the Image Transmission Module on the camera body, ensuring that the module’s 30pin connector is above the camera’s female connector, press down on both ends simultaneously till the module clicks into place.
3. Install the Antenna on the module, now your Ghost N2 is ready for use.


Reminder: when using the Ghost N2, please supply power on the USB port through the Power/Audio 2-in-1 Cable, since the camera could consume 1.5A current in peak period, camera may not work properly if the 2-in-1 cable (with external power) not applied.

4. About your camera
Power On/Off
Connect your Ghost N2 with External Power through the Power/Audio 2-in-1 cable, the camera will be automatically powered on, remove the external power from camera, it will automatically power off.
Mode Navigation
Press  button to toggle between Video mode and Settings mode.
Settings mode:
(Blue LED) In this mode you can setup your livestreaming or HD record parameters. Press  to scroll down through the menu options, or press and hold
  to navigate up. Use
  to change options for the highlighted setting. At any time, press the
  button to return to Video mode.
HD Record On/Off
Field Of View 140/115/90
Exposure 0/1/2/-1/-2
Bitrate High/Middle/Low
Filters Normal/Vivid/Low Light
ISO Sensitivity Auto/100/200/400/800
Video Stabilization On/Off
Microphone Front/Rear
Microphone Sensitivity 0/1/2/3/4/5
Speaker Volume Off/Low/Med/High
LED Indicator On/Off
Indicator Timer Off/5s/10s/20s/1m
Date YY-MM-DD
Date Stamp On/Off
Camera off Never/2m/5m/10m/20m
Thumbnail Files On/Off
Language EN/CN/FR/GE/IT/SP
Reset Settings Yes/No
Format SD Card Yes/No
Serial Number xxxxxx
Firmware Version x.x.x.x
5. Features Overview
HD Record mode
In the menu, set HD video as On from your camera’s settings menu, your camera is mainly for recording, while the stream video will only be used for preview (resolution fixed as 480P), you can control the camera to record by the physical Record button on cam, or through Drift Link App remotely, in this settings, camera can record up to 4K resolution.
Live stream mode
In the menu, set HD video as Off from your camera’s settings menu, your camera will be in Livestream mode, by setting to this mode, you can remotely setup various livestream resolution, however, you can not to do local recording in this mode.
Connect to the network
To connect your camera into a network for livestream or remote control, you need to manually put a script file on the root directory of Micro SD card.
Create a file named as fmcom.conf on your computer, using Notepad to open it and write in below contents, please change the value of router_ssid, router_password according to yours, once finished, save it and copy to the root directory of camera’s memory card, please note you can setup the stream resolution/bitrate according to your network quality, options of resolutions include 1080P,720P,WVGA, bitrate is recommended between 1000000 – 8000000.
Reminder: please make sure the suffix of the script file is kept as original .conf, if you saved it as .txt file, it wouldn’t work as expected.
Example contents in the script file for local network connection (using RTSP protocol)
router_ssid=RD-TEST_5G
router_password=foream123
stream_resolution=1080P
stream_bitrate=4000000
stream_framerate=30
stream_type=rtsp
Example contents in the script file for livestreaming to cloud (using RTMP protocol), in order to stream to your platform, you need to acquire the RTMP URL and setup in the line of “rtmp_url=”.
router_ssid= RD-TEST_5G
router_password= foream123
stream_resolution=1080P
stream_gop=30
stream_bitrate=4000000
stream_framerate=30
stream_audio=1
rtmp_url=rtmp://xxxxxxx
rtmp_cbr=0
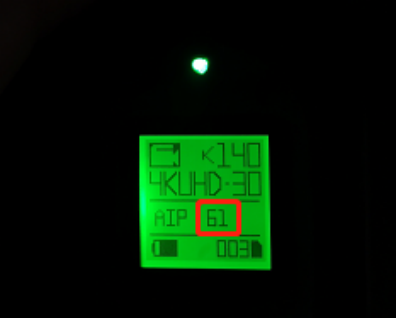
once the script file is saved on the memory card, remove the camera from computer, plug in the external power on the USB port through the 2-in-1 Power/Audio cable, the camera will be powered on, and connect to the router automatically. once it’s connected, the Wi-Fi LED (above real screen) will be solid green, and you can see the IP address (the fourth 8-bit field) on the rear screen as the following.
6. Drift Link App
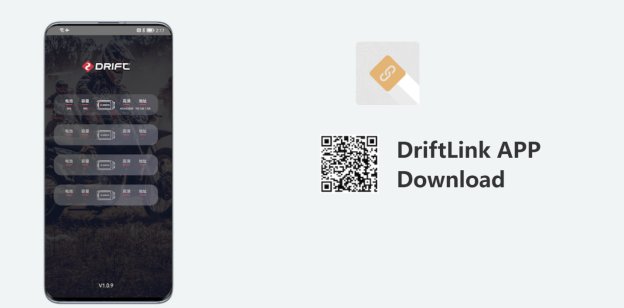
From your mobile’s browser, scan below QR code to download and install Drift Link App

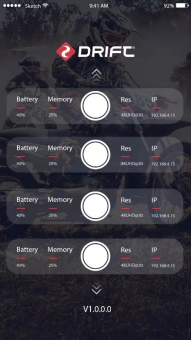
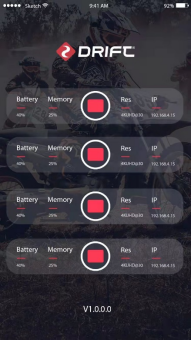
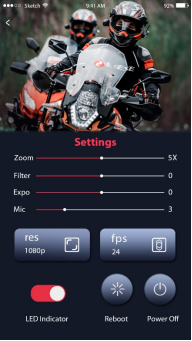
Once installed, conenct your mobile to the same network as what Ghost N2 connected, turn on the App, you should see the camera appeared on the list, marked with a Red block, you can also see the basic info of the camera including IP address, resolution, battery, and remaining space on the memory card, tap on the camera box, you will be brought to to the preview page, from where you can control the camera remotely, e.g. zoom in/out, adjust Filter, Exposure and Mic sensitivity.
Drift Link is a tool in order to manipulate the camera remotely, if you need to do livestream, you can use your computer to access the network stream by input the URL as : rtsp://IP address/live, where IP address is your cam’s IP, for example, if your camera is with this address:192.168.5.22, you can access the camera live feed by : rtsp://192.168.5.22/live.
Once the live feed is on your computer, you can broadcast it to the Internet through your PC tool.
Connecting to a PC
1. Connect the camera using the USB cable (provided); the camera screen will show a USB icon.
2. The camera’s folder may open automatically; if not, open using My Computer.
3. The camera should be recognised as a removable disk; double-click to open.
4. Open the DCIM folder to access your files.
Connecting to a Mac
1. Connect the camera using the USB cable (provided); the camera screen will show a USB icon.
2. The camera’s folder may open automatically; if not, open using Finder.
3. The camera should be recognised as an external device; double-click to open.
4. Open the DCIM folder to access your files.
7. How to access real-time video from your camera (for developers)
1. Find the default router gateway of your network: From a computer in the same network, click “Start”, type “cmd” and press “Enter” to open the Command Prompt window. Type “ipconfig” and press “Enter” and you should find the Default Gateway, for example 192.168.4.1.
2. Look at your camera’s rear screen, you should see something like rtsp xxx. The 3 digits following “rtsp” are the last 8 bits of your IP address, for example, 148. Now you have your camera’s IP address as 192.168.4.148.
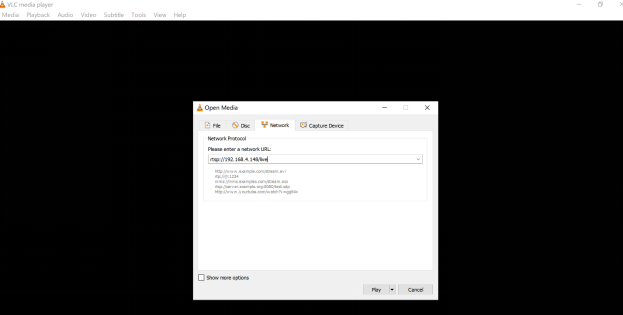
Lots of PC software can play live video through an RTSP address, such as VLC or Blue Iris. Take VLC as example.
1) Open VLC on your PC, navigate to media / open network streaming, input below texts “rtsp://192.168.4.148/live” in the URL dialog , where "192.168.4.148" is your camera’s IP address. 
2) Click on the “Play” button, you should see the live video from your camera instantly.
8. Remote Control & Setup (for developers)
With camera’s IP address, you can use HTTP commands to configure or manipulate your camera remotely from either a computer or mobile device.
Command list:
1. Zoom in/out
http://192.168.4.148/cgi-bin/foream_remote_control?dzoom=1
where the value set to dzoom can be from 1 to 10.
2. Setup RTMP live streaming
where 192.168.3.133:1935/live/5 stands for the URL of your RTMP server, here rtmp:// is omitted.
You can also setup the livestream resolution & bitrate with this command.
Note:in case the RTMP URL contains 【&】 character, please replace it with 【***】.
For example:
If the rtmp url is "rtmp://wxalivepush.weixin.qq.com/live/wx3059da5fb34ccef3-4?txSecret=bc91766cea0589c907c764cdf41d0047&txTime=629f7600"
The URL should be replaced to "rtmp://wxalivepush.weixin.qq.com/live/wx3059da5fb34ccef3-4?txSecret=bc91766cea0589c907c764cdf41d0047***txTime=629f7600"
3. Stop live stream
http://192.168.4.148/cgi-bin/foream_remote_control?stop_rtmp
4. Setup Livestream Resolution
http://192.168.4.148/cgi-bin/foream_remote_control?stream_res=0
where the value of stream_res can be:
3(1080P), 4(720P), 5(WVGA).
5. Setup Livestream Bitrate
http://192.168.4.148/cgi-bin/foream_remote_control?stream_bitrate=1000000
where stream bitrate value is in Byte, 1000000 means 1Mbyte, 8Mbps.
6. Setup Livestream Framerate
http://192.168.4.148/cgi-bin/foream_remote_control?stream_framerate=30
1080P(1920 * 1080,16:9): 30 / 60FPS
720P(1280 * 720,16:9): 30 / 60FPS
WVGA(854 * 480,16:9) 30FPS
7. Start Recording
http://192.168.4.148/cgi-bin/foream_remote_control?start_record
8. Stop Recording
http://192.168.4.148/cgi-bin/foream_remote_control?stop_record
9. Reset Setting
http://192.168.4.148/cgi-bin/foream_remote_control?reset_setting
10. Reboot your Camera
http://192.168.4.148/cgi-bin/foream_remote_control?reboot
11. Power off your camera
http://192.168.4.148/cgi-bin/foream_remote_control?power_off
12. Setup Camera LED Indicator
http://192.168.4.148/cgi-bin/foream_remote_control?led=1
where the value: 1 stands for On, 0 stands for Off
13. Setup Camera Exposure Value
http://192.168.4.148/cgi-bin/foream_remote_control?exposure=1
where the value: 0 stands for 0, 1 stands for 1, 2 stands for 2, 3 stands for -1, 4 stands for -2.
14. Set Camera Filter
http://192.168.4.148/cgi-bin/foream_remote_control?filter=1
where the value: 0 stands for Normal, 1 stands for Vivid and 2 stands for Low Light
15. Setup Camera Mic Sensitivity
http://192.168.4.148/cgi-bin/foream_remote_control?mic_sensitivity=1
where the value should be 0 to 5, 0 stands for Mic Off, 1 to 5 stands for each Mic level, from low to high.
16. Setup camera time
http://192.168.4.148/cgi-bin/foream_remote_control?set_time=2021-03-01_09:35:00
setup the camera time to : 2021/3/1 9:35.
17. Setup Video Recording Resolution
http://192.168.4.148/cgi-bin/foream_remote_control?video_res=0
where the value of video_res can be:
0(4K), 1(4KUHD), 2(27K), 3(1080P), 4(720P),5(WVGA).
18. Setup Video Bitrate
http://192.168.4.148/cgi-bin/foream_remote_control?video_bitrate=1000000
where video bitrate value is in Byte, 1000000 means 1Mbyte, 8Mbps.
19. Setup Video Recording Framerate
http://192.168.4.148/cgi-bin/foream_remote_control?video_framerate=30
4K(4096 * 2160 17:9): 24 / 25FPS
4KUHD(3840 * 2160,16:9): 24 / 25 / 30FPS
2.7K(2704 * 1520,16:9): 24 / 25 / 30 /50 FPS
1080P(1920 * 1080,16:9): 24 / 25 / 30 / 50 / 60 / 100 / 120FPS
720P(1280 * 720,16:9): 25 / 30 / 50 / 60 / 200 / 240 FPS
WVGA(854 * 480,16:9) 25 / 30FPS .
20. Get camera current status
http://192.168.4.148/cgi-bin/foream_remote_control?get_camera_status
return camera status in XML, for example:
<?xml version="1.0" encoding="utf-8"?>
<Response>
<Status>1</Status>
<Cam_Status>
<camera_status>
<capture_mode>0</capture_mode>
<battery>1</battery>
<sd_free>31150080</sd_free>
<sd_total>31154688</sd_total>
<rec_time>0</rec_time>
<fw_ver>8022</fw_ver>
<model_name>N1</model_name>
</camera_status>
<video_setting>
<res>2</res>
<framerate>30</framerate>
<bitrate>2000000</bitrate>
<quality>2</quality>
</video_setting>
<stream_setting>
<stream_res>2</stream_res>
<stream_framerate>30</stream_framerate>
<stream_bitrate>2000000</stream_bitrate>
</stream_setting>
<camera_setting>
<dzoom>0</dzoom>
<filter>0</filter>
<exposure>0</exposure>
<mic>3</mic>
<led>1</led>
<hd_record>0</hd_record>
</camera_setting>
</Cam_Status>
</Response>
Where the item :
<capture_mode>: 0 stands for video mode , 1 stands for photo mode, 2 stands for timelapse mode, 3 stands for burst mode;
N1/N2 only support video and photo mode.
<battery> means the remaining battery in percentage
<sd_free> means the free size of TF card capacity in KB, if the free size is less than 400Mbps, it will prompt card full and the recording is not allowed.
<sd_total> means the total size of TF card capacity in KB.
<rec_time>: 0 means camera is in idle mode, otherwise it stands for current recording time.
<fw_ver> the FW verson.
<model_name> the model name of camera
<hd_record>: 0 means it’s now in live streaming mode, 1 means it's now in HD recording mode.
21. list SD media folders
http://192.168.4.148/cgi-bin/foream_remote_control?list_folders=/tmp/SD0/DCIM
list all the media folders (DCIM) in the camera SD card
<?xml version="1.0" encoding="utf-8"?>
<Response>
<Folders>
{"Path":"100MEDIA"},
{"Path":"101MEDIA"},
{"Path":"102MEDIA"},
</Folders>
<Amount>3</Amount>
</Response>
22. list SD media files
http://192.168.4.148/cgi-bin/foream_remote_control?list_files=/tmp/SD0/DCIM
list all the media files on SD card.
<?xml version="1.0" encoding="utf-8"?>
<Response>
<Files>
{"Path":"100MEDIA/VID00001.MP4","CreateTime":"Nov 03 11:38:00 2021","Size":112767067,"Thumb":0},
{"Path":"100MEDIA/VID00002.MP4","CreateTime":"Nov 03 13:32:08 2021","Size":1686118,"Thumb":0},
{"Path":"100MEDIA/VID00003.MP4","CreateTime":"Nov 03 13:35:52 2021","Size":146324100,"Thumb":0},
</Files>
<Amount>3</Amount>
</Response>
Note:
If you want to preview or download the media file, please use the following URL:
http://192.168.4.148/DCIM/100MEDIA/VID00001.MP4
http://192.168.4.148/DCIM/100MEDIA/VID00002.MP4
9. Auto detection in a network (for developers)
Once a Ghost N2 connects into a network, it will broadcast a UDP package to present itself to devices (mobile or PC) in the same network. The package contains the necessary info for the device to establish the connection. Once connected, the device can issue http command to Drift camera for further actions, the following are the details of how the connection can be established.
1. Broadcast package (UDP) format
The broadcast package (from camera) is in this format
5|cam_serial|cam_model||cam_status
Definition:
1)5 - fixed value to specify the broadcast type
2)cam_Serial – Camera Serial Number
3)cam_Model – Camera Model
4)cam_Status - Camera Status, the default is n, indicating normal status.
Note: camera’s IP address is embedded in the header of the UDP package which can be extracted by the receiver.
2. Acquire real-time video feed from camera
once the connection is established, an application can use a media player (such as VLC, ijk or vitamio player) to acquire real-time video feed. The command format is the following
RTSP:
rtsp://Camera IP/live
TCP:
tcp://Camera IP:8001
3. Camera control
Once the connection is established, the application can manipulate camera with the commands described in above section.
GHOST N2快速指南
感谢您购买Drift GHOST N2
客户支持
下载完整的手册并查看我们的官方网站,了解固件更新,客户支持以及我们所有产品的信息。 https://driftinnovation.com/
如果您有任何建议、意见或疑虑;请通过以下方式联系我们的客户支持团队: sales@driftinnovation.com
保修条款
如果产品因人为损坏,误操作,事故,火灾,冻伤,水损坏,疏忽或不遵循提供的操作说明
而损坏,则保修不适用。 有关保修的更多信息,请参阅:
https://driftinnovation.com/warranty
说明书内容 :
1. 产品规格
2. 包装内容
3. 安装大功率WiFi模块
4. 关于相机
5. 功能概述
6. Drift Link APP相关使用说明
7. 如何访问实时视频流(仅适用于开发人员)
8. 远程控制和设置 (仅适用于开发人员)
9. 局域网自动检测功能(仅适用于开发人员)
1. 产品规格:
相机拍摄分辨率
4K(4096 * 2160 17:9): 24 / 25FPS
4KUHD(3840 * 2160,16:9): 24 / 25 / 30FPS
2.7K(2704 * 1520,16:9): 25 / 30 / 50FPS
1080P(1920 * 1080,16:9): 24 / 25 / 30 / 50 / 60 / 100 / 120FPS
720P(1280 * 720,16:9): 25 / 30 / 50 / 60 / 200 /240FPS
WVGA(854 * 480,16:9) 25 / 30FPS
直播分辨率:
1080P(1920 * 1080,16:9): 30 / 60 FPS
720P(1280 * 720,16:9): 30 / 60 FPS
WVGA(854 * 480,16:9) 30 FPS
实时流比特率(码率):最大可调8 Mbps
直播协议:RTSP,RTMP,H.264
麦克风:内部和外部
USB:Mini USB
尺寸:43(W)* 82.2(L)* 31.4(H)mm
重量:140g
2. 包装内容
(1)Ghost 4K+ 机器
(2)图传模组
配件袋
(1)天线
(2)USB供电+Mic 转接二合一线
(3)USB数据线
3. 安装大功率WiFi模块:
1)将【两根天线】拧进【图传模组】的两个螺丝口,组成大功率模组,如下图;
2)从Ghost 4K +相机中取出原始【电池模组】,可以使用卡针如下图箭头方向翘起;
3)将网卡模组按照原始【电池模块】相对应位置放置,确保该模块的30针连接器位于相机的母连接器上方,同时将其两端平稳按下,直到模块卡入到位;

温馨提示:使用 Ghost N2 时,请通过电源/音频二合一线为 USB 接口供电,由于相机在高峰期会消耗 1.5A 电流,所以需要保证相机至少有2A供电。
4. 关于相机:
(1)相机开关机:插入USB供电线相机会自动开机(如图,注意区分USB数据线),拔出供电线相机自动关机;
(2)模式导航:按  按钮可在视频模式和设置模式之间切换。
(3)设置模式:蓝色LED):在此模式下,您可以设置直播或高清拍摄参数,按  按钮向下切换菜单,长按
  按钮向上切换菜单,按
  可以修改设置项。在任何时候按
  按钮可返回视频模式。
高清拍摄 开 / 关
可视角 140 /115 /90
曝光 0 / 1 / 2 / -1 / -2
码率 高 / 中 / 低
场景 正常 / 鲜艳 / 夜间模式 / 潜水
ISO 自动 / 100 / 200 / 400 / 800
防抖 开 / 关
麦克风 前 / 后
麦克风音量 关 / 1 / 2 / 3 / 4 / 5
扬声器音量 关 / 低 / 中 / 高
指示灯 开 / 关
指示灯定时器 关 / 5s / 10s / 20s / 1m
日期 YY-MM-DD
时间水印 开 / 关
自动关机 从不 / 2m / 5m / 10m / 20m
缩略图文件 开 / 关
语言 Eng / CN / FR / DE / IT / SP
重置设置 是 / 否
格式化SD卡 是 / 否
序列号 xxxxxx
固件版本 x.x.x.x
5. 功能概述:
1. 高清录像模式:在菜单中,将【高清拍摄】设置为开,您的相机主要用于录制,而流视频将仅用于预览(分辨率固定为480P),您可以通过按相机上的 按钮控制相机录像或通过 Drift Link App 远程控制,在此设置下,相机最高可录制 4K 分辨率。
2. 直播模式:在菜单中,将【高清拍摄】设置为关闭,您的摄像机将处于直播模式,通过设置该模式,您可以远程设置各种直播分辨率,但是您不能在此模式下进行本地录制。
3. 相机连接Windows电脑(可查看SD卡文件)
(1)使用USB数据线(随附)连接相机和电脑;相机屏幕上将显示一个USB图标。
(2)相机的文件夹可能会自动打开;如果没有打开请移步到“我的电脑”打开。
(3)相机应被视为可移动磁盘;找到可移动磁盘双击打开。
(4)打开DCIM文件夹可访问您的文件。
4. 相机连接Mac电脑
(1)使用USB数据线(随附)连接相机和电脑;相机屏幕上将显示一个USB图标。
(2)相机的文件夹可能会自动打开;如果没有打开请使用Finder打开。
(3)相机应被视为外部设备;找外部设备双击打开。
(4)打开DCIM文件夹以访问您的文件。
5. 相机连接网络:
要将您的摄像机连接到网络进行直播或远程控制,您需要手动将脚本文件放在 Micro SD 卡的根目录下,在你的电脑上创建一个名为fmcom.conf的文件,用记事本打开并写入以下内容,请根据你的路由器更改router_ssid、router_password的值,并根据你的网络设置static_ip、static_router、static_netmask,一次完成后,保存并复制到相机存储卡的根目录下。
提醒:请确保脚本文件的后缀为原始.conf,如果保存为.txt文件,将无法正常工作。
脚本文件中的示例内容
router_ssid=RD-TEST_5G
router_password=foream123
stream_resolution=1080P
stream_bitrate=4000000
stream_framerate=30
static_ip=192.168.5.22
static_router=192.168.5.1
static_netmask=255.255.255.0
stream_type=rtsp
脚本文件保存到内存卡后,将相机从电脑中取出,通过2合1电源/音频线将外部电源插入USB端口,相机将开机,并连接到路由器自动地。连接成功后,Wi-Fi LED(实屏上方)将呈绿色常亮,您可以在后屏上看到 IP 地址(第四个 8 位字段),如下所示

6. Drift Link App:
(1)在您的手机浏览器中,扫描下方二维码下载并安装 Drift Link App;
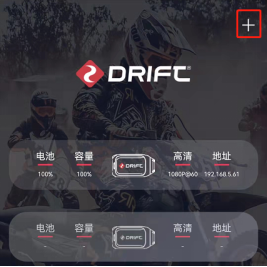
(2)打开安装好的APP,点击界面右上角的“+”进入【添加相机】界面;
(3)输入当前手机连接网络的Wi-Fi密码并点击确认,此时会出现如下二维码,此时可以通过长按相机  键,当听到语音提示时对准二维码进行扫描连接网络操作,相机连接成功后APP会自动退出【添加相机】界面返回到主界面;
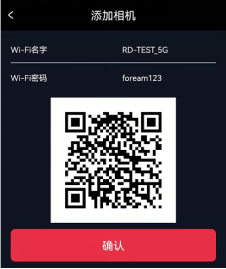
提示:Wi-Fi名字是您所连接网络的Wi-Fi名字,APP会直接获取无需输入,如果您想使用热点来连接的话,那么直接输入热点名称和密码即可。
注意:N2只支持5.8G频段的WiFi,不支持2.4G频段。
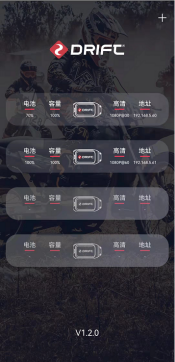
(4)返回到主界面后APP会检测到相机相关信息,其中有电池剩余电、SD剩余容量、相机分辨率和相机IP地址,如下图1:
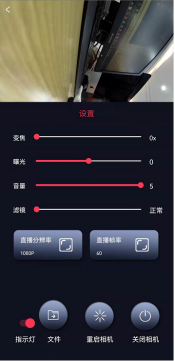
(5)点击相机信息框APP会跳转到当前相机视角的预览画面,此时相机LED背光灯会变红,此时我们可以通过APP来控制相机的变焦、曝光、相机麦克风音量、滤镜、分辨率、帧率等设置,还可以关闭和重启相机以及关闭相机LED灯,如下图2:
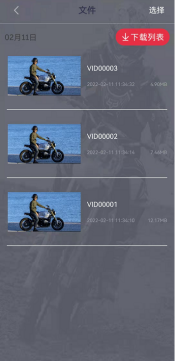
(6)点击预览界面下方的【文件】可以进入相机SD卡文件列表,此时你可以通过点击视频图片预览视频文件,也可以点击右上角的【选择】按钮选择视频文件进行下载,下载后在手机相册中可以查看到下载文件,如上图3;
7. 如何访问实时视频流(仅适用于开发人员)
如果您需要做直播,您可以用你的电脑访问网络流,输入URL为:rtsp://IP 地址/live,其中IP地址是你的相机的IP,例如,如果当前相机IP地址为:192.168.4.148,您可以通过以下方式访问摄像头直播:rtsp://192.168.4.148/live。
许多 PC 软件可以通过 RTSP 地址播放实时视频,例如 VLC 或 Blue Iris。 以 VLC 为例。在您的PC上打开VLC,点击左上角的媒体---打开网络串流,在 URL 对话框中输入以下文本“rtsp://192.168.4.148/live”如图:
8. 远程控制和设置(仅适用于开发人员)
通过摄像机的 IP 地址,您可以使用 HTTP 命令从电脑或移动设备远程配置或操作摄像机。
注意:以下的IP地址192.168.4.148是相机的IP地址,需要根据相机实际进行修改
(1)放大/缩小
http://192.168.4.148/cgi-bin/foream_remote_control?dzoom=1
设置dzoom的值可以在0到10之间。值0表示视频恢复无dzoom状态。
(2)设置RTMP实时流
http://192.168.4.148/cgi-bin/foream_remote_control?start_rtmp_with_param=192.168.3.133:1935/live/5&stream_res=720P&stream_bitrate=2000000
其中192.168.3.133:1935/live/5代表RTMP服务器的URL,此处省略rtmp://。 您也可以使用此命令设置实时分辨率和比特率。
注意:如果RTMP URL包含【&】字符,请用【***】代替。
比如如果推流地址为 “rtmp://wxalivepush.weixin.qq.com/live/wx3059da5fb34ccef3-4?txSecret=bc91766cea0589c907c764cdf41d0047&txTime=629f7600"
那转换后地址为: "rtmp://wxalivepush.weixin.qq.com/live/wx3059da5fb34ccef3-4?txSecret=bc91766cea0589c907c764cdf41d0047***txTime=629f7600"
(3)停止直播
http://192.168.4.148/cgi-bin/foream_remote_control?stop_rtmp
(4)设置直播分辨率
http://192.168.4.148/cgi-bin/foream_remote_control?stream_res=0
其中stream_res的值可以是:
Ghost N2: 3(1080P),4(720P),5(WVGA)。
(5)设置直播比特率
http://192.168.4.148/cgi-bin/foream_remote_control?stream_bitrate=1000000
流比特率值以字节为单位,1000000表示1Mbyte,8Mbps。
注意:最多可以为Ghost 4K +配置45Mbps(值= 5625000)
(6)设置直播帧率
http://192.168.4.148/cgi-bin/foream_remote_control?stream_framerate=30
1080P: 30、60 FPS
720P: 30、60 FPS
WVGA: 30 FPS
(7)开始录音
http://192.168.4.148/cgi-bin/foream_remote_control?start_record
(8)停止录像
http://192.168.4.148/cgi-bin/foream_remote_control?stop_record
(9)重启相机
http://192.168.4.148/cgi-bin/foream_remote_control?reboot
(10)恢复出厂设置
http://192.168.4.148/cgi-bin/foream_remote_control?reset_setting
(11)关闭相机电源
http://192.168.4.148/cgi-bin/foream_remote_control?power_off
(12)设置相机LED指示灯
http://192.168.4.148/cgi-bin/foream_remote_control?led=1
其中值:1代表开,0代表关
(13)设置相机曝光值
http://192.168.4.148/cgi-bin/foream_remote_control?exposure=1
其中:0代表0,1代表1,2代表2,3代表-1,4代表-2。
(14)设置相机滤镜
http://192.168.4.148/cgi-bin/foream_remote_control?filter=1
其中值:0代表正常,1代表鲜艳,2代表低光
(15)设置相机的麦克风灵敏度
http://192.168.4.148/cgi-bin/foream_remote_control?mic_sensitivity=1
其中值应为0到5,0 为关闭Mic,1-5 分别代表每个麦克风电平。
(16)设置相机的系统时间
http://192.168.4.148/cgi-bin/foream_remote_control?set_time=2021-03-01_09:35:00
设置相机的时间为: 2021年3月1日,9:35分。
(17)设置高清拍摄分辨率
http://192.168.4.148/cgi-bin/foream_remote_control?video_res=0
其中video_res的值可以是:
Ghost N2:0(4K),1(4KUHD),2(2.7K),3(1080P),4(720P),5(WVGA)。
(18)设置高清拍摄比特率
http://192.168.4.148/cgi-bin/foream_remote_control?video_bitrate=1000000
流比特率值以字节为单位,1000000表示1Mbyte,8Mbps。
(19)设置高清拍摄帧率
http://192.168.4.148/cgi-bin/foream_remote_control?video_framerate=30
4K: 24、25 FPS
4KUHD: 24、25、30 FPS
2.7K: 25、30、50 FPS
1080P: 24、25、30、50、60、100、120 FPS
720P: 25、30、50、60、200、240FPS
WVGA: 25、30 FPS
(20)获取相机设置及状态
http://192.168.4.148/cgi-bin/foream_remote_control?get_camera_status
返回XML格式:
<?xml version="1.0" encoding="utf-8"?>
<Response>
<Status>1</Status>
<Cam_Status>
<camera_status>
<capture_mode>0</capture_mode>
<battery>1</battery>
<sd_free>31150080</sd_free>
<sd_total>31154688</sd_total>
<rec_time>0</rec_time>
<fw_ver>9012</fw_ver>
<model_name>N2</model_name>
</camera_status>
<video_setting>
<res>2</res>
<framerate>30</framerate>
<bitrate>2000000</bitrate>
<quality>2</quality>
</video_setting>
<stream_setting>
<stream_res>2</stream_res>
<stream_framerate>30</stream_framerate>
<stream_bitrate>2000000</stream_bitrate>
</stream_setting>
<camera_setting>
<dzoom>0</dzoom>
<filter>0</filter>
<exposure>0</exposure>
<mic>3</mic>
<led>1</led>
<hd_record>0</hd_record>
</camera_setting>
</Cam_Status>
</Response>
(21)列举SD卡的媒体目录
http://192.168.4.148/cgi-bin/foream_remote_control?list_folders=/tmp/SD0/DCIM
返回:
<?xml version="1.0" encoding="utf-8"?>
<Response>
<Folders>
{"Path":"100MEDIA"},
{"Path":"101MEDIA"},
{"Path":"102MEDIA"},
</Folders>
<Amount>3</Amount>
</Response>
(22)获取SD卡的所有媒体文件(视频及图片)
http://192.168.4.148/cgi-bin/foream_remote_control?list_files=/tmp/SD0/DCIM/
返回:
<?xml version="1.0" encoding="utf-8"?>
<Response>
<Files>
{"Path":"100MEDIA/VID00001.MP4","CreateTime":"Nov 03 11:38:00 2021","Size":112767067,"Thumb":0},
{"Path":"100MEDIA/VID00002.MP4","CreateTime":"Nov 03 13:32:08 2021","Size":1686118,"Thumb":0},
{"Path":"100MEDIA/VID00003.MP4","CreateTime":"Nov 03 13:35:52 2021","Size":146324100,"Thumb":0},
</Files>
<Amount>3</Amount>
</Response>
Note:
如果你想预览或下载相机中的文件,可以使用如下 URL:
http://192.168.4.148/DCIM/100MEDIA/VID00001.MP4
http://192.168.4.148/DCIM/100MEDIA/VID00002.MP4
(23) 删除文件
http://192.168.5.56/cgi-bin/foream_remote_control?delete_media_file=100MEDIA/VID00003.MP4
9. 局域网自动检测功能(仅适用于开发人员)
Ghost N2连接上网络后,它将广播UDP数据包,以将其自身呈现给同一网络中的设备(移动设备或PC)。该软件包包含设备建立连接所需的信息。连接后设备可以向Drift相机发出http命令以进行下一步的操作,以下是如何建立连接的详细信息。
1. 广播包(UDP)格式
广播包(来自摄像机)是这种格式
5 | cam_serial | cam_model || cam_status
定义:
1)5-指定广播类型的固定值
2)cam_Serial –摄像机序列号
3)cam_Model –相机型号
4)cam_Status-摄像机状态,默认为n,表示正常状态。
注意:摄像机的IP地址嵌入在UDP包的标头中,可以由接收方提取。
2. 从摄像机获取实时视频
建立连接后,应用程序可以使用媒体播放器(例如VLC,ijk或vitamio播放器)来获取实时视频。命令格式如下
RTSP:
rtsp://摄像机IP /实时
TCP: tcp://摄像机IP:8001
3. 相机控制 建立连接后,应用程序可以使用上一节中描述的命令来操作摄像机。